# Function to download and process subtitlesdownload_and_process_subtitles(){localvideo_url="$1"localbase_filename="$2"# Download subtitles using yt-dlp yt-dlp --write-auto-subs --sub-format "vtt" --skip-download -o "${base_filename}.%(lang)s.%(ext)s""$video_url"# Find the downloaded subtitle filelocalsubtitle_file=$(ls ${base_filename}.*.vtt | head -1)# Check if the subtitle file existsif[ -f "$subtitle_file"];then# Process the subtitle file to remove tags, timestamps and duplicate lines perl -ne 'print unless /<.*>/ or /^\s*$/ or /-->/'"$subtitle_file"| awk '!seen[$0]++' > "${base_filename}.txt"echo"Processed subtitle saved as ${base_filename}.txt"elseecho"No subtitle file found."fi}# VariablesVIDEO_URL="video url"BASE_FILENAME="basename"# Call the functiondownload_and_process_subtitles "$VIDEO_URL""$BASE_FILENAME"
[[Obsidian]] works amazingly well on iOS, it is really satisfying to write notes on mobile with it. Along with iOS shortcuts and automation, using Obsidian streamlines your mobile note-taking experience like never before.
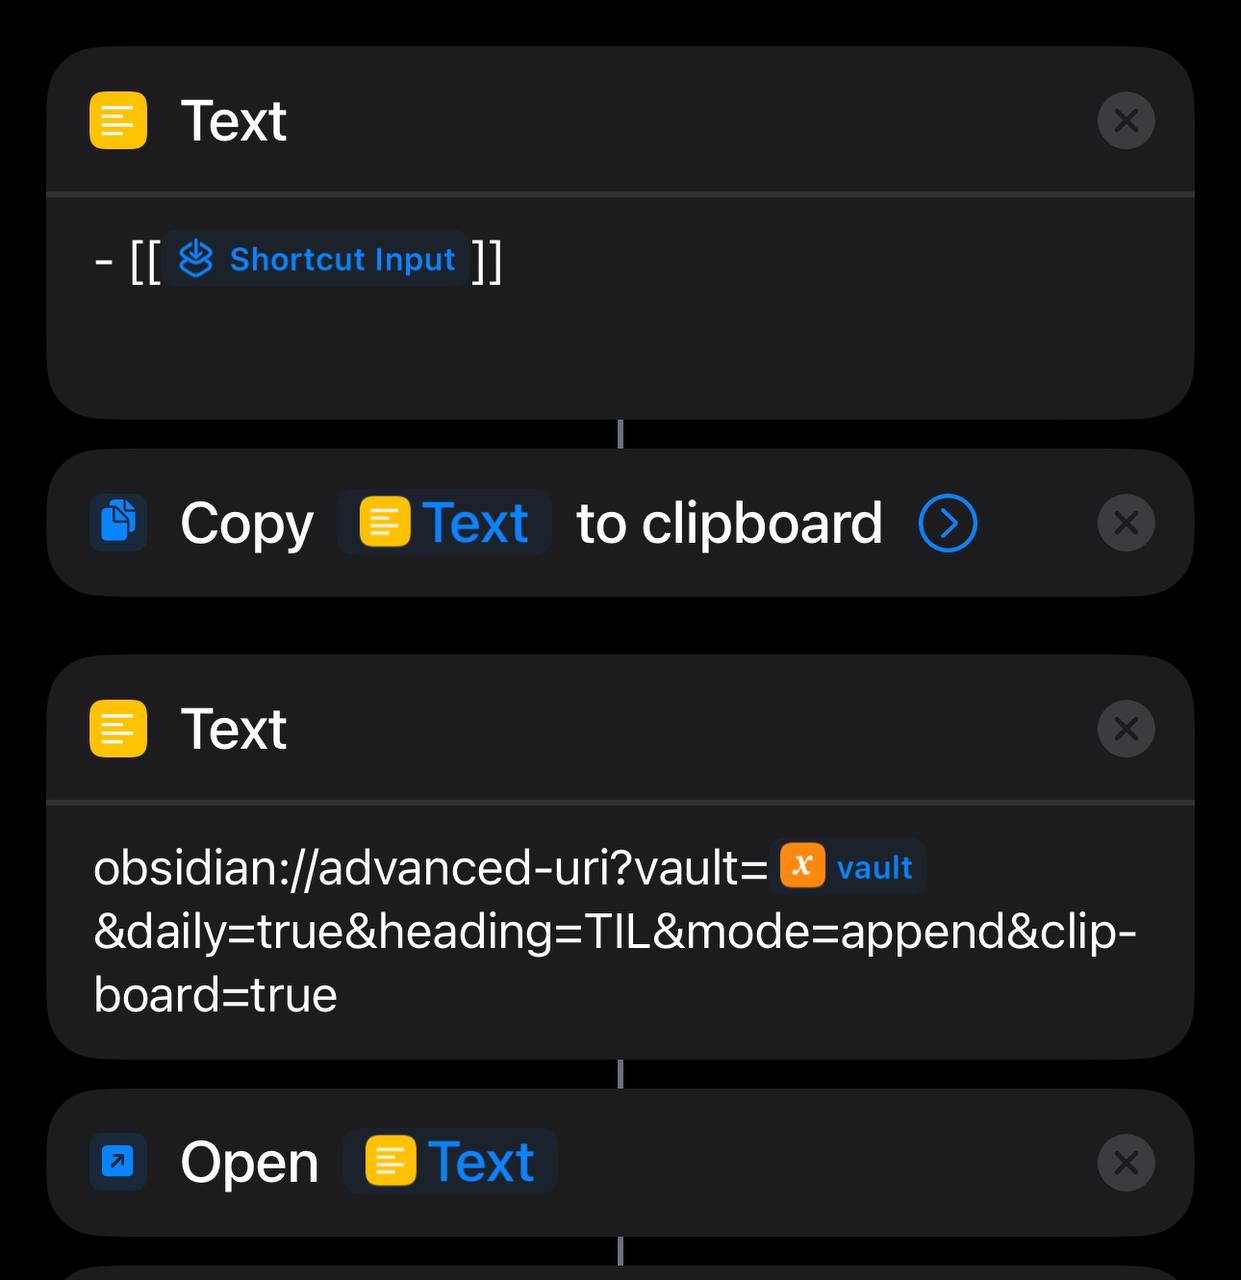
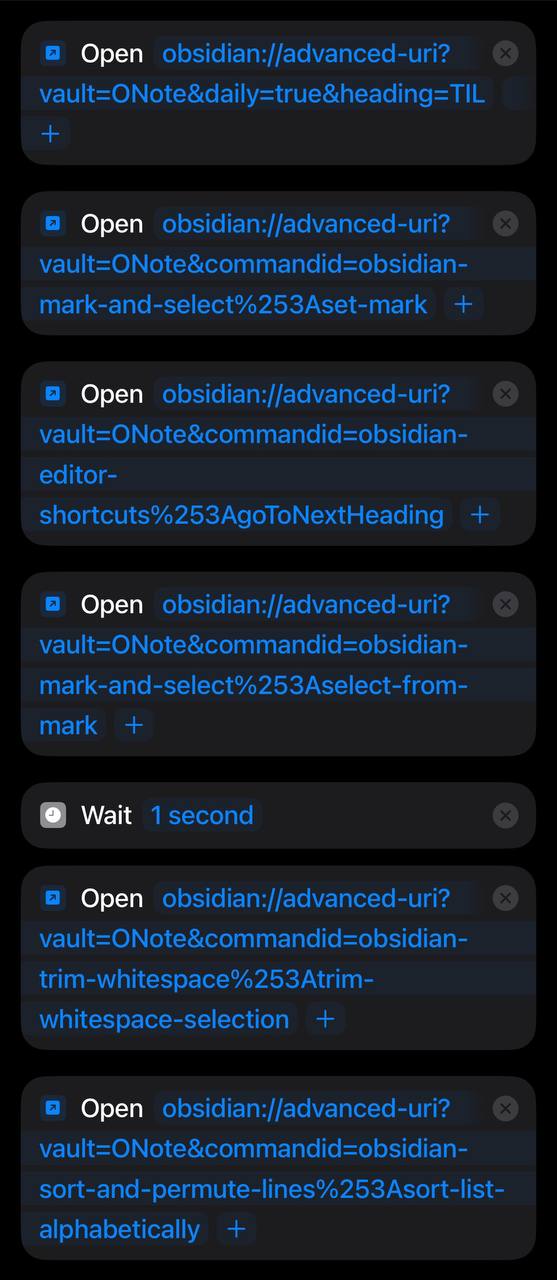
This plugin exposes api to Obsidian via schema URL, combing it with iOS shortcuts make it possible to perform complex automation, like creating note, appending note and reordering list (via Sort & Permutation plugin).
There is a Call Command parameter for calling command from other plugins, which is the key component to automate with iOS shortcuts.
example: add to list and reorder list alphabetically
select some text and use share menu, select the shortcut.
add to the heading TIL on daily note
use commands from various plugin to do following steps:
open the note and place cursor at specific heading
The same shortcut workflow used on iOS can be reused on macOS via services, amazing cutting the boilerplate of manually copy & pasting note taking process.
I learned that surprisingly, the brain areas activated during language processing and coding are not the same, nor do they overlap.
Additionally, human languages tend to minimize word dependency distance, which has provided me with valuable insight into the structure of the German language. In German, there’s a rule that places the verb at the end of a subordinate clause.
Initially, this might seem odd, but it becomes logical from the perspective of minimizing word dependency distance. Consider the sentence:
“Die neuen Richtlinien legen fest, dass die Projekte je nach ihrer ökologischen Bedeutung eingestuft werden könnten.”
In this example, the words in the latter part of the subordinate clause are closely positioned, making the sentence easier to process.
The terms “imperfect” and “perfect” in grammatical tenses refer to specific aspects of actions in terms of their time frames and completeness, and these terms can be somewhat confusing because they don’t align with the everyday meanings of “perfect” and “imperfect.”
Imperfect (Präteritum)
1. Meaning in Grammar
In German, the “imperfect” tense, known as Präteritum, is primarily used in written language to describe past events, particularly in narratives. It corresponds to both the simple past and the imperfect in English.
2. Etymology and Usage
The term “imperfect” comes from Latin, where it means “not completed.” It refers to an action that was ongoing or repeated in the past. This meaning carries into English and German grammar but focuses more on the narrative style of recounting past events without specifying whether the action was completed. In German, it is used less frequently in spoken language and more in writing, as it gives a formal, literary quality to the text.
Perfect Tense
1. Meaning in Grammar
The perfect tense in German (Perfekt) is used to describe actions that were completed in the past but are relevant to the present. It is the most common way to convey past events in spoken German.
2. Etymology and Usage
The term “perfect” in grammatical usage is derived from Latin “perfectus,” which means “complete.” The perfect tense is used to indicate that an action in the past has been completed, and its effects or results may still be relevant at the present time. This is why it’s called “perfect” – it signifies that the action is fully complete or “perfected.”
Why These Terms?
The usage of “perfect” and “imperfect” in grammar does not relate directly to their everyday meanings. In everyday language, “perfect” suggests something flawless or ideal, while “imperfect” suggests something incomplete or flawed. In grammatical terms, however, “perfect” relates to the completion of an action, and “imperfect” to the ongoing nature of an action in the past.
Summary
Imperfect (Präteritum) is used for describing past actions typically in a narrative, literary context.
Perfect (Perfekt) is used for indicating actions that were completed in the past but have a connection to the present, commonly used in spoken German.
These terms help to categorize and teach the various ways different languages express time and aspect in verb tenses, even though they might seem counterintuitive based on their names alone.
“Ankündigen” is a separable verb and consists of the prefix “an-” and the base verb “kündigen,” which on its own means “to terminate” or “to quit,” usually in the context of employment or contracts. The prefix “an-” changes the meaning of the base verb to imply the start or the announcement of something.
how to understand the connection
Understanding how the prefix “an-” alters the meaning of the base verb “kündigen” in German can indeed seem challenging, especially when the meanings of the prefix and base verb appear quite distinct. Here’s a more intuitive way to comprehend this transformation:
Linguistic Analysis
Base Verb “kündigen”: Originally means “to terminate” or “to give notice.” This verb indicates ending something formally, such as a contract or employment.
Prefix “an-”: This prefix in German often signifies the beginning of an action or adds a sense of initiation to the base verb. It can also denote attachment or proximity.
Conceptual Bridge
The key to understanding “ankündigen” lies in bridging the concepts of ‘starting’ and ’ending’. When you “kündigen” (terminate), you’re essentially bringing something to an end. However, many endings naturally lead to new beginnings. Adding “an-” to “kündigen” shifts the focus from the end of one phase to the initiation of another. In essence, “ankündigen” involves initiating the process of making others aware of a new beginning or change. It’s about declaring the start of something new that follows the end of something old.
Example in Context
Consider a situation where a company decides to terminate a product line (“kündigen”). The announcement of this decision (“ankündigen”) marks the beginning of a new phase for the company, such as the introduction of a new product line or strategy. Here, “ankündigen” does not just communicate the termination but also sets the stage for what is to come next.
Memory Tips
Visualize a Door: Imagine closing one door (“kündigen”) and immediately turning to open another (“ankündigen”). The act of announcing is like opening that new door.
Think of a Sequel: When a film ends, the announcement of a sequel is akin to “ankündigen.” It signals the start of a new narrative following the conclusion of the previous one.
By visualizing the transition from ending to beginning and understanding “an-” as a marker of initiation, “ankündigen” can be seen as a natural and intuitive extension of “kündigen.” This conceptual connection helps grasp the transformation effected by the prefix and aids in memorizing the usage of these verbs in German.
But there is another form of good-bye that is very commonly used, although mostly with good friends. It is very casual. It comes from a long time past when it was fashionable to use the French word when bidding farewell to friends: adieu. In the course of time, and with people from all over the German-speaking world pronouncing and mispronouncing the word, it somehow got an s attached to it. Then it lost its first syllable. And in time it became simply Tschis (CHUESS).
different weather phenomena along with their genders.
die Sonne (the sun) - Feminine
der Regen (the rain) - Masculine
der Schnee (the snow) - Masculine
das Gewitter (the thunderstorm) - Neuter
die Wolke (the cloud) - Feminine
der Blitz (the lightning) - Masculine
der Sturm (the storm) - Masculine
der Wind (the wind) - Masculine
Mnemonic Device
Feminine (die): Think of Sun and Clouds as nurturing elements in nature, traditionally associated with feminine qualities. Hence, “die Sonne” (sun) and “die Wolke” (cloud) are feminine.
Masculine (der): Rain, Snow, Lightning, Storm, and Wind can be associated with strength and force, often seen as masculine traits. So, “der Regen” (rain), “der Schnee” (snow), “der Blitz” (lightning), “der Sturm” (storm), and “der Wind” (wind) are masculine.
Neuter (das): Thunderstorm is a mix of various elements (rain, lightning, thunder). You can think of it as a complex phenomenon that doesn’t fit into a single category, thus making “das Gewitter” (thunderstorm) neuter.
Docker daemon ports: add something like tcp://0.0.0.0:9999 in /etc/docker/daemon.json
It’s about the Docker daemon’s ability to accept commands (like starting/stopping containers, pulling images, etc.) over the network.
forwarding container ports
This is about exposing a specific port of a running container to the host or the outside world, allowing network traffic to reach the service running inside the container.
summary
In summary, setting the Docker daemon to listen on certain TCP ports is about remote management of the Docker engine itself, while forwarding ports for a container is about allowing external access to services running inside that container.
As a seasoned Emacs user, I’ve been eagerly anticipating the built-in arrival of use-package in version 29.1. And now it’s finally here! This
declarative configuration tool
has already become my go-to for confining all the chaotic Emacs configurations, making everything more organized and manageable. So, if you haven’t already, I’d wholeheartedly recommend upgrading your Emacs to the latest version 29.1.
Tips for Checking Package Installation
When you’re neck-deep in code, it’s quite common to forget whether you’ve installed a particular package or not. Emacs has got you covered with several commands:
featurep: Use this if a package ends with provide.
fboundp: This comes in handy when you need to check if a certain function is defined.
bound-and-true-p: Use this to confirm whether a global minor mode is both installed and activated.
The Power of cl-letf
I’ve found
cl-letfto be incredibly useful when I need to dynamically and temporarily override functions and values defined externally. It’s particularly handy when paired with advice, allowing me to alter the behavior of third-party packages without meddling with their source code.
Here’s a practical example of how to override a function defined in a package. The code modifies the behavior of original-split-window-horizontally inside create-window so that no matter what argument it receives, a fixed width is used:
(defunmy-create-window-advice(orig-fun&restargs)"Advice to modify the behavior of `split-window-horizontally' in `create-window'."(let((original-split-window-horizontally(symbol-function'split-window-horizontally))(fixed-width20)))(cl-letf(((symbol-function'split-window-horizontally)(lambda(&optionalsize)(funcalloriginal-split-window-horizontallyfixed-width))))(applyorig-funargs))))(advice-add'create-window:around#'my-create-window-advice)
Embracing thread-first and thread-last Macros
One of my favorite features of Emacs version 25 and onwards is the built-in thread-first and thread-last macros. These can prove immensely useful when dealing with complex data transformations - they help maintain clean and readable code.
In Emacs Lisp, the thread-first and thread-last are powerful tools for improving the readability of function call sequences. They allow for a more intuitive and linear style of writing nested function calls, especially useful in situations where you have multiple operations that need to be applied in sequence.
After a decade of using Emacs, it continues to be an indispensable part of my programming arsenal. Once one has really recognized the extensibility of emacs, it’s hard to not miss it every time using another editor.